I have a new project posted at
Mama on the Fly - this time, a simple gift for Mom. And it's not too late - you can make one of these in a couple of hours tops!
Let's make a beaded bracelet for Mom this
Mother's Day. Here's what you need:
Wire snips or an old pair of
scissors
Needle nose pliers
Jewelry wire
A package or two of beads (your
choice of color and shape)
*Keep in
mind - if you buy two different packages
of beads, they should be somewhat similar in size and watch out for beads that
might be too big and bulky on a bracelet.
A clasp of some sort - I prefer
the toggle clasp (you can see what it looks like in the pictures below)
A package of crimp tubes
* All
of my supplies were purchased at Hobby Lobby
I spent about $13.50 on the above
supplies (I already had the tools) and I had enough product to make 2
bracelets.
Start with a length of wire. My
bracelet size is 7 1/2 " so I started with a piece of wire measuring about
8 1/2 ". If Mom is petite, you
might only need to start with 7 1/2 " or so but I'm a bigger gal so I need
that extra inch :)
Start by threading one end of
your wire into a crimp tube first and then into the loop on one piece of the
toggle clasp.
Now bring the wire over the loop and insert it back into the
crimp tube.
Pull the short tail of the wire
until the crimp tube is snug against the loop of the toggle piece. Grab your
pliers and pinch the crimp tube so it flattens. This will secure the wire in
place and keep it from slipping out of the crimp tube.
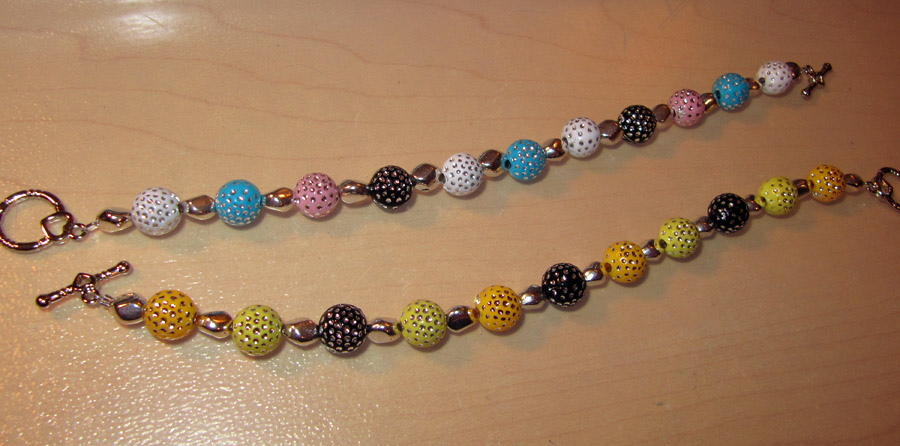
Now, depending on the beads you
purchased, you might want to lay them out on your work surface in an
arrangement that you like so threading them onto the wire will be quick and
easy. This is the arrangement I started with:
I did have to make some
adjustments to this arrangement as I was working on the bracelet because I had
more beads than wire but you can adjust as you go.
Once you have an arrangement you
like, start threading beads on the wire. This is the part that the kids can
definitely help with! Remember that little tail of wire you had when you
attached one piece of the toggle clasp? Just slide it inside the first bead or
two to hide it.
Continue stringing beads until
you have about an inch of wire left. Leave enough wire to work through a second
crimp tube and the other half of your toggle clasp. Run it around the loop of
the clasp and back into the crimp tube again, just like you did when you
started the bracelet. Pull the tail of this wire snugly so there is not a lot
of empty wire showing in your bracelet. Once it's snug, pinch the crimp tube
with your pliers.
And your bracelet is done!
Here is a picture of the 2nd
bracelet I made using the same supplies, just a different color combination of
beads:
I hope you enjoy this project -
I'm sure Mom will love her gift because who doesn't like jewelry? Thank you for stopping by! For more Mother's Day ideas, be sure to visit Petite-Party Planners and check out my review of Iron Man 3 at Are You on the Fence!