I struggled a bit to learn how to work this new feature in Silhouette so as I worked out the bugs, I took photos to share so what I learned might help you too!
So let's start at the beginning - choosing a stamp to make a cut file for. In this demo, I am using Doodlie-Do from Papertrey Ink. (Click any pics to see a larger image).

I started with just one image but you'll see as we go here that I added a second image as well.
In addition to having the PixScan mat, you will need to upgrade your Silhouette version to the most recent, otherwise, you can't use the mat.
After stamping my image, I originally tried to photograph it and import it into the Cameo software (using the PixScan button, located in the toolbar toward the top left - actually third button in on the left) but I soon realized that I needed to calibrate the camera I was using first. In order to do this, you will need to print out a calibration sheet on your printer. It looks like this:

Yep, just a sheet full of dots. Now, using the camera you want to use for your image photo, take a picture of this sheet. Be sure you get edge to edge and include all the dots. Be sure the lighting is good and the paper is on a flat surface and shoot the picture straight on from above. I used my iPhone camera and what you see above is the actual photo I took.
Now this photo has to be loaded onto your pc and uploaded into your Silhouette software. I did not take pictures of this but the option for this is located under the PixScan button I mentioned previously, and then under Import From File. This is where you will find the Camera Calibration button. Once your camera is calibrated, you can take a picture of your image.

Again, you want to take the picture in good lighting with the mat on a flat surface. You can see I have a little shadow in the bottom left but that didn't affect it. Be sure your photo is taken straight on from above and the entire mat must be easily seen in the photo. Now upload your photo to your pc and then upload into the Silhouette software, still using that PixScan button. It will take a couple of minutes to display your image on the screen and if the photo isn't clear enough, you will be prompted to take a new photo.

Here is my image on the computer screen. Once it displayed, I went to the Trace Window, selected the trace area (around my two images), clicked the High Pass Filter off, and chose Trace Outer Edge. If you look closely in the photo above, you can see the red outline around each image.
Now, send to Silhouette and change any settings you need to at the bottom button, Adjust Cut Settings. Now you're ready to load your mat. A word of caution, be sure to load the mat correctly or the Cameo will not be able to read the registration marks and you will get the message that registration failed. See below:
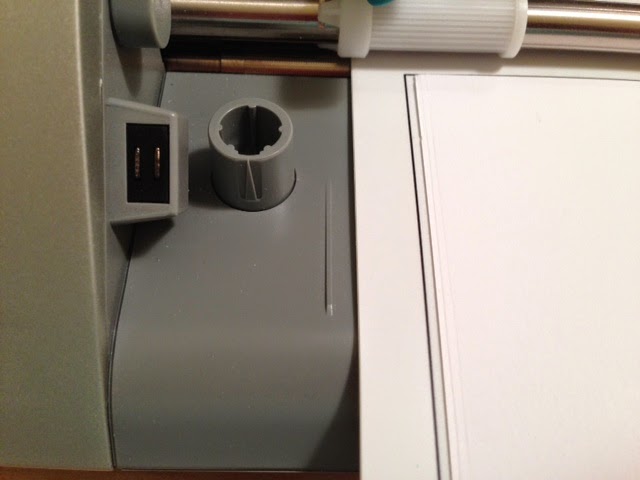
See that small line to the left of my mat? That cannot be covered. If it is, your mat is loaded incorrectly.
Also, just to back up a little, before I cut I did one other thing. I figured if I was going to cut out the images I stamped, I might want additional die cuts of the same images to use in the future. So I replicated the cut lines and filled my whole sheet of cardstock as seen below:

Look closely and you can see red outlines around the cardstock.
So my mat is now loaded correctly and I press Start. Cutting finishes and I remove the mat and voila! Cut pieces that are sized perfectly to my stamped images. Here are the plain ones I can use in the future:

And here are the two images I originally stamped and Cameo cut for me using PixScan:

Pretty nifty, huh? I think that is a very nice cut - better than I could do by hand with scissors and if I had used a die, I may not have lined up my stamped image quite so well.
I'm sure there are other tricks to using the PixScan mat but I hope this at least gets you up and running. Happy crafting!