Showing posts with label Mama on the Fly. Show all posts

5/7/13

Mother's Day Bracelet

I have a new project posted at Mama on the Fly - this time, a simple gift for Mom. And it's not too late - you can make one of these in a couple of hours tops!


Let's make a beaded bracelet for Mom this Mother's Day. Here's what you need:

Wire snips or an old pair of scissors
Needle nose pliers
Jewelry wire
A package or two of beads (your choice of color and shape)

*Keep in mind  - if you buy two different packages of beads, they should be somewhat similar in size and watch out for beads that might be too big and bulky on a bracelet.

A clasp of some sort - I prefer the toggle clasp (you can see what it looks like in the pictures below)
A package of crimp tubes

* All of my supplies were purchased at Hobby Lobby


I spent about $13.50 on the above supplies (I already had the tools) and I had enough product to make 2 bracelets.

Start with a length of wire. My bracelet size is 7 1/2 " so I started with a piece of wire measuring about 8 1/2 ".  If Mom is petite, you might only need to start with 7 1/2 " or so but I'm a bigger gal so I need that extra inch :)

 Start by threading one end of your wire into a crimp tube first and then into the loop on one piece of the toggle clasp.


 Now bring the wire over the loop and insert it back into the crimp tube.


Pull the short tail of the wire until the crimp tube is snug against the loop of the toggle piece. Grab your pliers and pinch the crimp tube so it flattens. This will secure the wire in place and keep it from slipping out of the crimp tube.

Now, depending on the beads you purchased, you might want to lay them out on your work surface in an arrangement that you like so threading them onto the wire will be quick and easy. This is the arrangement I started with:


I did have to make some adjustments to this arrangement as I was working on the bracelet because I had more beads than wire but you can adjust as you go.

Once you have an arrangement you like, start threading beads on the wire. This is the part that the kids can definitely help with! Remember that little tail of wire you had when you attached one piece of the toggle clasp? Just slide it inside the first bead or two to hide it.

Continue stringing beads until you have about an inch of wire left. Leave enough wire to work through a second crimp tube and the other half of your toggle clasp. Run it around the loop of the clasp and back into the crimp tube again, just like you did when you started the bracelet. Pull the tail of this wire snugly so there is not a lot of empty wire showing in your bracelet. Once it's snug, pinch the crimp tube with your pliers.

And your bracelet is done!


Here is a picture of the 2nd bracelet I made using the same supplies, just a different color combination of beads:
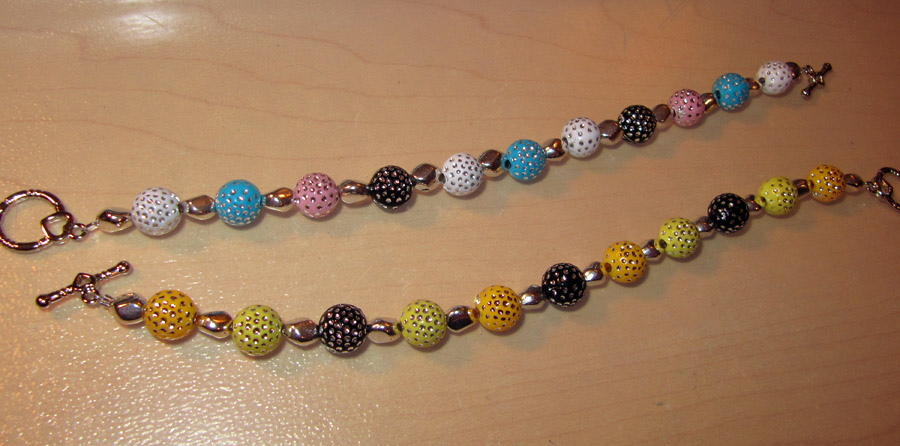
 

I hope you enjoy this project - I'm sure Mom will love her gift because who doesn't like jewelry? Thank you for stopping by! For more Mother's Day ideas, be sure to visit Petite-Party Planners and check out my review of Iron Man 3 at Are You on the Fence!
 

 photo myname.png

3/19/13

Easter Basket Centerpiece

This project was created for Mama on the Fly but her website was hacked and I'm not sure when she will get it posted but I wanted to share here so there is still time for you to get creating before Easter hops away!

Easter Basket Centerpiece


Here is what you need to get started:

Easter Basket - any size will work - mine is about 8-10" in diameter.
A block of styrofoam - I used a disk - see photo
Floral Tape
Floral Picks with wires
Bunches of greenery and flowers. Choose flowers and greens you like but keep in mind the size of your basket when picking. A larger basket can accommodate larger flowers, a smaller basket needs smaller pieces. I think the best choice includes greenery that is in 2 different sizes - a little larger leaf and a little smaller leaf, and the same thing with the flowers - grab some larger ones and a bunch of smaller ones.

Additional tip: I chose a pansy flower bunch, not only because I love them but also because they are a great flower to cluster together - they look natural when they are bunched together.

You may also need wire cutters.

Here are some photos of my supplies:


Start with your basket and styrofoam. I didn't want my styrofoam sinking to the bottom of the basket so I folded up a small old hand towel and put it in the basket first and then laid the stryfoam on top it.


I used the floral tape to secure the styrofoam so it stays in place and isn't wiggling around while I'm working.

Grab your larger greenery bunch and cut it into single strands. I like the look of something that is viney so that is what I started with. In this case, the branches were all wired so I could simple stick the cut end right into the stryofoam. Start adding greenery around the edges, going into the styrofoam at a horizontal angle and allow the greens to spill over the edge of the basket. Continue to fill in around the edges and then add shorter pieces to the center. This will look fairly messy and somewhat "bald" but that's ok!

Here is my basket with the main greenery added:


Yep, see all those empty spots? We'll get those filled in shortly.

I then cut apart my smaller bunch of greenery and because these were not wired, I added a floral pick to each stem as shown below.
This will give support to the branch and give you something firm to insert into the styrofoam. Add these pieces throughout the basket as well.


Now we get to the flowers. The pansies I used had very long stems, so I cut them down to a shorter length and then just started inserting each cluster into the stryfoam. If your flowers include leaves, keep the leaves on! This will help fill up those blank spaces.
It's starting to come together! Keep filling in with flowers and greenery until your basket is pretty full.

The last step is to add your second, tinier flower as a little filler. Cut apart and don't use bunches that are too big. This should just be a little extra pop of color and interest. Here is a close-up with my smaller flowers added in:

And you're done! If you want, you can add a bow to the handle but if you have colorful flowers, you may want to leave it as is - a bow may just overwhelm the entire piece.

And here is another look at the final arrangement:


The nice thing about this arrangement is that, after Easter, you can carefully untape the styrofoam from the basket, work the floral arrangement out of the basket and place it in a different container so you can display your arrangement all summer long!

All products purchased at Hobby Lobby. Total cost approximately $25.00. Your price may vary depending on items chosen and current sales.


 photo myname.png

12/11/12

Another wreath to share!


I have been seeing a lot of mesh wreath ideas on the web so decided to try my hand at creating one. My friend Kathy and I grabbed our supplies and spent one Sunday afternoon getting our craft on and here are the results:


This is a red and lime green rolled wreath - a little variation on the "normal" bunched mesh wreath. It reminds me of something Suessical! My step-by-step directions can be found at Mama on the Fly. It's a very simple project and makes a very eye-catching wreath! (Please ignore some of the rolls in the photo above - the picture was taken before I refluffed and straightened a few sections).

Here is Kathy's all red version - along with Kathy's smiling face:


Yes, these are pretty big when finished! What I would call a hard-to-miss decor item...picture this on your front door! If you make one for yourself, be sure to send me a photo - I would love to see it!

Be back again soon!


Photobucket

11/13/12

Gratitude Album

November is the month in which we take more than a moment's notice of all we are thankful for. This theme led me to create this month's project for Mama on the Fly. All of the directions for making this album (and ideas for variations on this project) can be found on Carolyn's blog. I shared just the cover and page 1 of the album there - the rest of the pages are here for you to, hopefully, be inspired by!

These first two photos are the ones posted at Mama on the Fly - the cover of the album and the first page, featuring my wonderful husband:


 Here are the remaining pages:

My daughter and son-in-law

My son

My pooch :)

My family at the table for Thanksgiving dinner.


I included a hand written note to each person (even the dog) telling them why I am thankful for them and how much they mean to me. I hope you will create something similar that documents your thoughts and feelings. It's a wonderful way to not only take time to count your blessings but also to let those who mean so much to you know how very special they are!

Thank you, Carolyn, for letting me share this project at Mama on the Fly!
Photobucket

10/10/12

Halloween Treat Holder - and Treat

I have a new craft project - and treat recipe - posted at Mama on the Fly - here's a sneak peek:


You can find step-by-step directions at Carolyn's blog - I hope you'll stop by and check it out! She will also be talking about the project on 101.5 The River tomorrow morning!

In other news, yesterday was my birthday. Thank you to everyone that left me a birthday wish throughout the day - makes a girl feel special!!
I took the day off work, slept in, did NO cooking, spent the evening with my family and cake. It was the perfect day!

Be back soon with more fun things to share!


Photobucket

9/18/12

Autumn Centerpiece with Mama on the Fly!

If you follow me on Facebook, then you have already heard this news. I am teaming up with local blogger Carolyn Savage at her Mama on the Fly blog to bring you some crafty goodness!

I have a photo to share with you of the fall centerpiece I created this time around but to get all the step-by-step photos and directions, I encourage you to visit Carolyn's blog. And while you're there, check out the rest of Carolyn's site. She has a lot to offer and you may find she is a familiar name. In the Toledo area, the Savage name is well-known, but across the country, Carolyn and husband Sean have been in the news regarding their heartbreaking story about an "botched" invitro process that left Carolyn pregnant with another couple's baby and how the Savages decided to continue the pregnancy and give the gift of life to another couple struggling with infertility. Her story is at her site and you can read further in her book, Inconceivable. I highly recommend it!

So on to the project! My "assignment" was to create a fall centerpiece. Well, if you've visited by blog for some time now, you know I am predominantly a paper crafter. But I have dabbled in all sorts of crafty endeavors so I was up to the challenge! Here is the final project:


I also created a couple of accessory pieces but you'll have to pop over to Mama on the Fly to see those. And if you're in the Toledo area (or have iHeart Radio), be sure to tune in tomorrow morning to 101.5 The River about 7:30-8 am when Carolyn is "on air" talking about this project. And maybe me. I hope she has good things to say!  :)

Have a great Wednesday!


Photobucket