Showing posts with label Easter. Show all posts

3/30/15

Easter Bunny time!

Well it's not quite Easter Bunny time but I did spend a little time with my honey-bunny seeing the Easter Bunny this past weekend -


As much as he really did not like Santa Claus, the Easter Bunny was pretty cool! Look at that smile - melts my heart!

I also have a card to share today that is going out to a few people for Easter -


I'm really excited about this card - it's the first I made with my new MISTI stamping tool! If you haven't heard of the MISTI yet, check out the video at this site (where you also order the MISTI). What I love about it is the accuracy of stamping you can achieve. I could never stamp a background that precisely before so I'm thrilled with the results! And the best thing? If your image doesn't stamp clearly enough the first time, just reink and stamp again in the exact. same. spot! It is just the niftiest invention ever!!

The stamps and cardstock used her are all from Papertrey Ink.

Thanks for stopping by and in case I don't make it back in time, have a wonderful and blessed Easter!

 photo post-sig4.png

4/18/14

Easter Cards

When it's the Tuesday before Easter, you get to crafting so cards can get in the mail and to people by Easter! So that's what I did the other day - a little card creating. Here are the results:


Obviously the same image (Impression Obsession) on these 2 cards - just a little variance in coloring and finishing. I love this image - so unique! These are going to my Mom and Aunt.


This one is so cute in person and there's even a little glitter around the edges of the "peeps" (Close To My Heart) to mimic the sugar. Ah, sugar-induced Easter coma - looking forward to it! Are you a Peeps person? I love them super fresh, hubby likes them stale. This card is for my daughter and son-in-law.


And of course I can't forget a special little somebunny! He's too little for the candy this year but he'll enjoy some sweet potatoes at dinner and maybe just a lick of frosting from the cake I'm making for dessert. Yes, candy and cake - look out scale, I'm gonna blow it this Sunday! (Bunny from Papertrey Ink, eggs from Close To My Heart).

Hope you all have a wonderful Easter weekend and remember the greatest gift we all received through the death and resurrection of God's Son, Jesus.
See you again soon!

 photo post-sig4.png

3/27/13

Simple Easter cards

As I was out of town last week for vacation, I didn't get any crafting time in and now, well, Easter is just a few days away so I had to hop to it today and get some cards ready for the mail! I kept it simple and production line style and finished up 4 cards quick as a bunny:


Now they may not be the most elaborate or intricate cards but they were quick and easy and right now, that's what I was going for! I cut all the card bases first and then the layers - one in color and one in white. While I was cutting, I also cut a 5/8th inch strip for each card. I embossed each white front using a Papertrey Ink impression plate and then die cut 8 eggs using a PTI die. I stamped the eggs then with ink to match the paper I was using on each card and then drew over the details on each egg with a glue pen, followed by some Prisma glitter sprinkled on. That was the most time consuming part - that and trying to clean up the excess glitter I manage to get all over every time I use it! (Some of the glitter looks weird in the photo above - I think it was the way the lights reflected off it).

Once the glittering was done, it was assembly time and 4 cards are now addressed and ready for the PO tomorrow morning!

How are your Easter plans coming?

 photo myname.png

3/19/13

Easter Basket Centerpiece

This project was created for Mama on the Fly but her website was hacked and I'm not sure when she will get it posted but I wanted to share here so there is still time for you to get creating before Easter hops away!

Easter Basket Centerpiece


Here is what you need to get started:

Easter Basket - any size will work - mine is about 8-10" in diameter.
A block of styrofoam - I used a disk - see photo
Floral Tape
Floral Picks with wires
Bunches of greenery and flowers. Choose flowers and greens you like but keep in mind the size of your basket when picking. A larger basket can accommodate larger flowers, a smaller basket needs smaller pieces. I think the best choice includes greenery that is in 2 different sizes - a little larger leaf and a little smaller leaf, and the same thing with the flowers - grab some larger ones and a bunch of smaller ones.

Additional tip: I chose a pansy flower bunch, not only because I love them but also because they are a great flower to cluster together - they look natural when they are bunched together.

You may also need wire cutters.

Here are some photos of my supplies:


Start with your basket and styrofoam. I didn't want my styrofoam sinking to the bottom of the basket so I folded up a small old hand towel and put it in the basket first and then laid the stryfoam on top it.


I used the floral tape to secure the styrofoam so it stays in place and isn't wiggling around while I'm working.

Grab your larger greenery bunch and cut it into single strands. I like the look of something that is viney so that is what I started with. In this case, the branches were all wired so I could simple stick the cut end right into the stryofoam. Start adding greenery around the edges, going into the styrofoam at a horizontal angle and allow the greens to spill over the edge of the basket. Continue to fill in around the edges and then add shorter pieces to the center. This will look fairly messy and somewhat "bald" but that's ok!

Here is my basket with the main greenery added:


Yep, see all those empty spots? We'll get those filled in shortly.

I then cut apart my smaller bunch of greenery and because these were not wired, I added a floral pick to each stem as shown below.
This will give support to the branch and give you something firm to insert into the styrofoam. Add these pieces throughout the basket as well.


Now we get to the flowers. The pansies I used had very long stems, so I cut them down to a shorter length and then just started inserting each cluster into the stryfoam. If your flowers include leaves, keep the leaves on! This will help fill up those blank spaces.
It's starting to come together! Keep filling in with flowers and greenery until your basket is pretty full.

The last step is to add your second, tinier flower as a little filler. Cut apart and don't use bunches that are too big. This should just be a little extra pop of color and interest. Here is a close-up with my smaller flowers added in:

And you're done! If you want, you can add a bow to the handle but if you have colorful flowers, you may want to leave it as is - a bow may just overwhelm the entire piece.

And here is another look at the final arrangement:


The nice thing about this arrangement is that, after Easter, you can carefully untape the styrofoam from the basket, work the floral arrangement out of the basket and place it in a different container so you can display your arrangement all summer long!

All products purchased at Hobby Lobby. Total cost approximately $25.00. Your price may vary depending on items chosen and current sales.


 photo myname.png

3/9/13

A Bunny Pillow Box

This cutie-patootie pillow box is another template creation from Jen Balding at Girl Boy Girl Designs. What I love about it is that there is a twist from a conventional pillow box - it has a squared, flat bottom so it stands up! So I was thinking Easter and decided to make a Bunny Pillow Box - take a look:


The section that is gray is the pillow box itself. I cut it from a sheet of 12 x 12 cardstock on my Cameo and the great thing about this template is the fold/score lines are "poked" by the machine in the cutting process. Not sure how to describe that but let me tell you, makes scoring much easier! I assembled the box and then made the bunny face using a Nestabilities circle die. One large circle makes the face, 2 smaller ones for the cheeks (which I lightly outlines with pale pink chalk) and 2 even smaller ones for the eyes. That's it. I colored the eyes with a dark gray Copic marker, leaving a tiny piece white. I also added a little pale pink Copic for the mouth and a couple of hand drawn whiskers using a thin tip pen. Finally, the nose was die cut using a tiny flower die and felt (you could also use another small circle, a heart, etc...)

On the top of the pillow box are two holes which you can use to add a ribbon loop. I chose to thread a ribbon loop up through each hole creating two ribbon ears. Then a little matching bow, added with a glue dot, finishes my Easter Bunny box.

Thanks for hopping by and be sure to stop again soon for more creations and what-not! I love what-not.
Have a good weekend!

 photo myname.png

3/1/13

Egg-stra Special News and Easter Basket!

I am so excited to share some crafty news with you! As the Pretty Palette challenges closed down this past week, I moved up to join the My Time Made Easy main Design Team!!! I am thrilled to be working with Lauren's templates every month as I have been in love with her products since she started her own business (and before, truthfully)! And my first assignment begins today and I have a cutey-cute-cute project to share with you but first some info from My Time Made Easy that you will not want to miss!


Given the tough economy, we announced on Feb. 27th, that as of today, we have now decreased our prices by 20%!

I may be a company owner, but I am really just like you. I'm a stay at home mom to 3 children, living on one primary income. I get to share what I love with the world and enjoy what I do. I KNOW how hard it can be to try to keep your family going, while maintaining your sanity through crafting, and be able to afford to buy some items without a lot of guilt! So after much debate I feel this change will help all our very valued customers :D  
                                                                           
                                                                                                         Lauren Meader
                                                                                                         My Time Made Easy

How awesome is that? And after you see the adorable products being released in the store TODAY, you will want to take advantage of those savings and buy yourself some Spring-y goodies! And speaking of goodies, I bet you're ready to see my project - introducing Egg-stra Special!


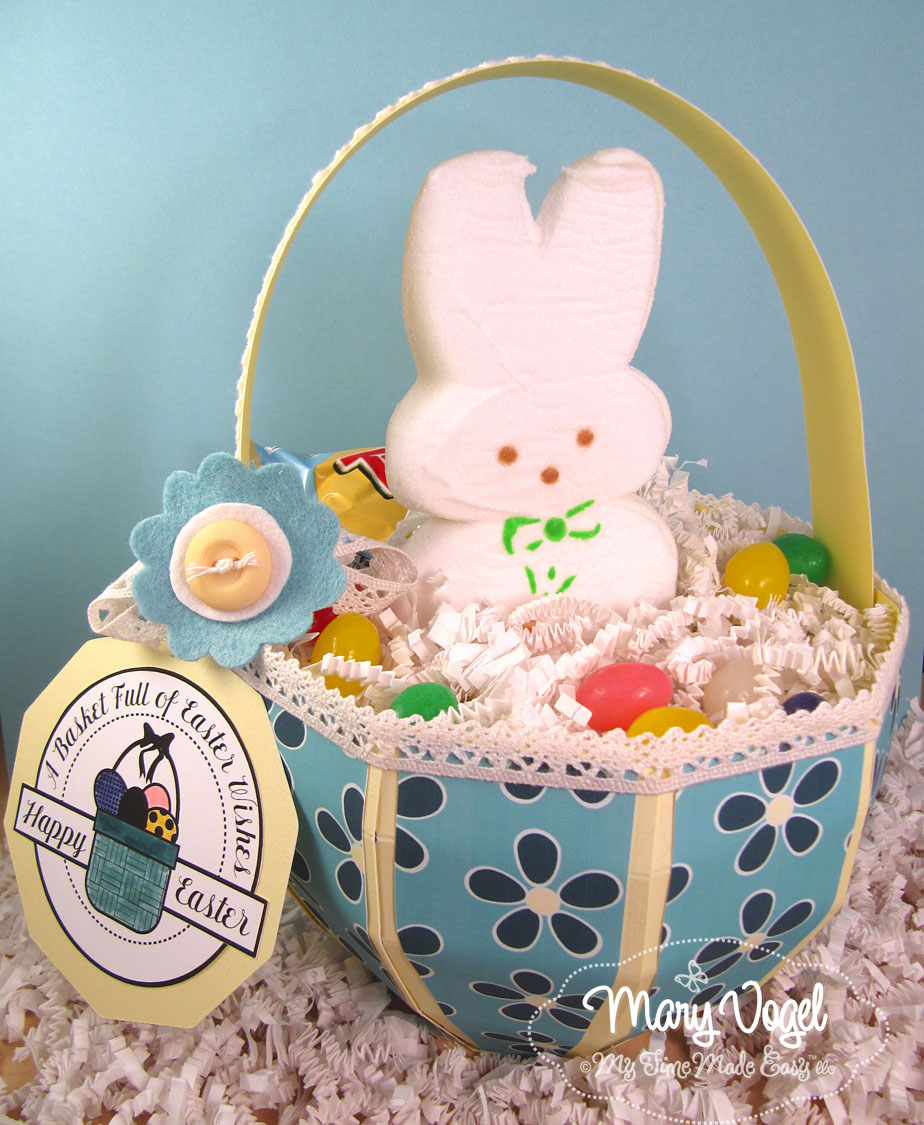
Now I couldn't just be normal and make the template the way it was supposed to be. See it's actual a complete egg, but I took a little liberty and used only the bottom half of the Egg-stra Special template. The paper is from the new digital paper pack Spring Has Sprung, which I printed on my inkjet printer. All of the template pieces were then cut on my Cameo. The handle is simply a 12 x 1.25 inch strip of cardstock, embellished with some crocheted trim.

I also made a tag and flower embellishment to dress up my basket - take a closer peek:


The image on the tag is one of the fun images in the Some Punny Easter digi stamp set, again printed and colored with a few Copics. I hand cut it out and layered it onto one of the cut pieces from the Egg-stra Special template and tied it to the basket handle. The flower was hand cut using the Fanciful Flowers cut file. I added a tied button to the center and a couple of crocheted trim "leaves" to finish it off and then filled my basket with gift bag filler (I couldn't find a good color Easter grass to use) and some little candies including two of my favorites - a Twix egg and a giant Peep! Swoon!

The Egg-stra Special template creates a fairly large egg so you can add any number of goodies inside. The rest of the team is also posting artwork using either the Egg-stra Special template or another new template Display. Here is a list of all of the team members - be sure to hop around and check out their amazing artwork!

  • Lauren Meader
  • Debbie Marcinkiewicz
  • Jackie Randolph
  • Karien vab der Westhuizen
  • Kimberly Morrow
  • Lisa Kind
  • Lori Hairston
  • Lori Kalus
  • Mary Vogel - you're here!
  • Pattie Goldman
  • Tangii Crain
  • Tracy Holmes


  • That's it for me today. Thanks for stopping by and come back on Sunday when I have another project to share with you using the Display template from My Time Made Easy. Until then, have a great day!


     photo myname.png

    4/6/12

    Easter Eggs, Bunnies and Chicks

    I have a couple more Easter cards to share with you before Easter comes and goes! I can't believe we're into April already!


    I made these cards using the Scrambled Eggs set from Papertrey Ink and the egg die. I found it easiest to die cut the eggs first, ink up the stamp and then lay the stamp on my work surface ink side up. Then I could take the die cut and lay it face down onto the stamp. That gave me much better placement of the image than the conventional way of stamping.

    The bunny's ears were stamped and hand cut and added to the card with the body of the bunny popped up on foam tape. The chick was stamped on yellow and white cardstocks and the white was cut along the shell line and added over the yellow. A little prisma glitter sparkles both images up a bit.

    Also, it's hard to see in this photo, but the background was impressed with the PTI linen impression plate. If you click the photo for a larger view you might be able to see that better.

    I'm off to clean house as we're hosting Easter dinner at our place and right now, I wouldn't want anyone to see the state the house is in! Have a good holiday weekend and I'll be back Sunday!

    Photobucket

    4/3/12

    Easter/Spring challenge

    I'm a little late joining the Easter/Spring party over at Heart 2 Heart Challenges but not too late for Easter! The theme of the challenge is, of course, Easter and/or spring and I can't wait to see what you create!

    REMINDER: You must use at least some Close To My Heart products in order to play along with our challenges!

    I used the super cute My Peeps stamp set to create a card bound for my mother-in-law in Texas -


    She recently hosted my husband on his trip to Texas so this is a double duty card - Easter and Thank you!

    I stamped the egg border a few times down a piece of kraft cardstock and once on a piece of cream. Then I punched out a section so I could highlight one egg which I colored with Copics. The sentiment was stamped with an alphabet from JustRite. Simple and flat for mailing!

    I hope you will join us at H2H this week. And be sure to check out my NEW CTMH website where you can now buy from the comfort of your home and get some great deals too!!!  The website is located here: http://mbryt1.ctmh.com. Be sure to check out the While Supplies Last section for some really great specials on soon to be retired items.

    Be back soon with more Easter fun!

    Photobucket